Heat Tape: Prepare NOW!

This year’s winter weather was one for the record books! If you’re in the Pacific Northwest, we are still holding our breath hoping that summer is just around the corner. Many home and commercial building owners had to deal with challenges when removing snow and ice from roof tops. Of course, that’s the time when we all think, “I wonder if heat tape would be helpful right now”. 

If you’re not familiar with heat tape and its benefits, I’m going to tell you right now…call an electrician NOW to get it installed onto your roof. Yes, I know we’re heading into April and enjoying the nice (snow-free) mild weather, but now is the time to be thinking of next year’s snow and ice potential. 

How Does It All Work?

When the joy of winter hits us, our roofs and gutters host massive amounts of snow and ice. When the sun is out and snow starts melting, the dripping water needs a path to drain off the roof. Heat tape can melt a channel in the underside of the snowpack on your roof and give water a route to drain out. And heat tape installed in gutters and downspouts allows water to drain away from the roof, rather than getting plugged up by a dam of ice.

*DISCLAIMER*

Be sure to keep an eye on your roof throughout winter for ice damming. If blocks of ice buildup under the snow, that could indicate inadequate insulation. Ice dams and icicles hanging from the roofline is a possible indication of not enough insulation in the attic. That’s an entire other conversation! However, if you do the air sealing and insulation work to begin with, the need for heat tape on the roof is drastically reduced.

How Does This Effect My Energy Bill?

Yes, those that have heat tape installed on roofs or in gutters to help prevent winter ice dams may find their energy bill heating up a bit. However, using a heat tape timer can help make the system run more efficiently when it’s needed, and turns it off automatically when it’s not needed.

The best time to run heat tape is during the day, 6 a.m. to 6 p.m. whenever snow or ice is sitting on the roof. Heat tape is not effective enough to sufficiently melt ice during cold evenings, and it will just waste power all night long. The goal is to run heat tape only enough to keep a channel cut in the snow or ice.

There Are Cool Tricks To Help Saved Money When Using Heat Tape:

Installation of a heat tape system with a manual toggle switch will easily turn on the tape only when it’s needed, and switch it off later.

Tying the heat tape system into the building’s automation controls so the heat tape only operates when the air temperature is above 32 degrees and the sun is out.

A good rule of thumb if you keep things “old school” is to mark your calendar for mid-April or making a note to turn off heat tape at the breaker switch after the last big spring snow.

Next Gen Electric is always here to answer any questions regarding prepping your home or commercial building for cold weather. We offer FREE estimates and always provide education to help you stay successful. Give us a call today!

Are You Eligible?

Solar adoption is taking flight thanks to the price of solar panels plummeting. This enables homeowners and businesses to save more money by controlling their own electricity costs instead of being at the mercy of rising utility rates.

We’ve shared before about the top motivators to switch to solar but for most, the federal incentive is where it’s at! Thanks to the Federal Residential Renewable Energy Tax Credit, homeowners can help themselves to a 30% incentive.

The Best Part?

This incentive is now good through December 31, 2019!

A tax credit is a dollar-for-dollar reduction in the amount of taxes owed. For example, a typical solar array with Next Gen will cost around $13,000 for a 4 kilowatt installation. In this example, the homeowner would benefit from the federal tax credit and reduce their taxes by $3,900. Yes, please!

This incentive is super easy to take advantage of. Like with any good deal, you much do your research to ensure that you’re eligible and how to claim your credit.

REMEMBER:

We know solar, not taxes! The information provided below may not be appropriate for your situation. Be sure to consult a tax professional before filling your tax credit to ensure you meet the requirements.

Eligibility

To qualify for the 30% Federal Residential Renewable Energy Tax Credit, you must meet the following requirements:

  • Have A System Installation Date On Or Before December 31, 2019
  • Panels Are On A Residential Location In The U.S.
  • The Solar Panel System Is New Or Being Used For The First Time
  • You Own The Panels (Not Leased)

Your Next Gen team is happy to help with any questions you may have. We know that going solar is a big decision and a large financial decision. That’s why we want to make sure that you are fully educated on how much your specific situation will cost and how much money you can expect to stay in your pocket. For a free Solar Site Evaluation, visit our website or call our office to get scheduled today: 208.765.WIRE.

For current information on incentives, including incentive-specific contact information, visit the Database of State Incentives for Renewables and Efficiency website at www.dsireusa.org.

Understanding Electric Vehicle Charging

Trading a gas pump for a plug-in is a wonderful thing. It’s far more convenient, saves you time, and keeps you from breathing toxic fumes after fueling. Charging is a different experience all together and understanding the ins and outs can take some time. I’ve been driving electric for over two years and I’m still learning!

If you’re looking to drive electric, you may want to get ahead of the learning curve now. It will save you some time and it may even help you save some money! 

Mostly, I’ll relate how charging works for a Nissan Leaf, a four-door, five-passenger hatchback with a range of about 100 miles. I’m most proficient with this product since that’s what we have for our family vehicle. I’m my experience, it’s one of the best local commuter care since the Leaf is intended for typical daily driving, which means around 40 miles or less per day. Occasional longer trips are certainly possible with this vehicle. By understanding charging, you will soon be able to evaluate whether an EV will suit your driving needs.
 

Level 1 Charging: Standard Outlet

Level 1 charging is the technical jargon for plugging your car into a standard household 120V outlet. For a Leaf, this means about 4.5 miles of range per hour of charging, or about 22 hours for a full charge.

22 hours?! That’s way too long! 

Hold on! Let’s break this down. First of all, you’ll rarely need to do a full charge from 100% empty to a full charge. If you drive 40 miles per day and charge overnight, you’ll be back to full in 9 hours. Think about charging your cell phone. Most of us plug in our phones at night once we hit the hay. We don’t think about how long it’ll take to charge once we’re sleeping, right? We’re just happy that charging is complete once we wake up and need to start our day. 

What if you have to drive more than 40 miles in one day, say 80 miles? Yes, it would take 18 hours to get a full charge, but with a 9-hour overnight charge, you’ll be ready for your normal commute the next day. And, if you drive less than 40 miles per day or charge for more than 9 hours, you’ll work back up to a full charge over the next day or so. 

If you need to drive 80 miles on consecutive days, you’ll need a “plan b”. That gas-guzzler you keep around for long trips? You may have to opt for that one. Or, there may be public EV chargers in your area. You can sneak in a movie, dinner, or shopping while you plug in. 

Beyond range issues, Level 1 may not be suitable for primary charging in all cases. In extreme climates, more power may be required to maintain proper battery temperatures. In these cases, Level 2 charging may be more appropriate.
 

Level 2 Charging: Charging Station

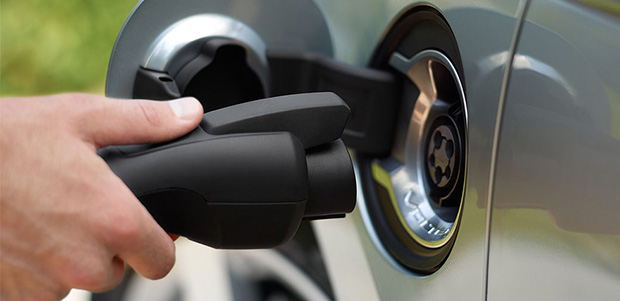
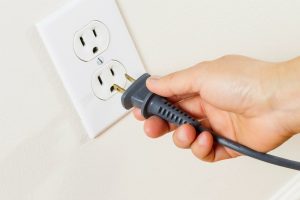
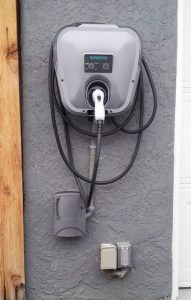
Level 2 supplies 240V, like what an electric dryer or oven uses. It goes through a box and a cord that improves safety by waiting to send power to the plug until it’s plugged into an EV. Level 2 allows for a wide range of charging speeds, all the way up to 70 miles of range per hour of charging. Both Level 1 and Level 2 charging stations simply deliver household electricity to the car. Electronics within the car transform the power into the proper form which then charges the battery.                                   
Nissan recommends that you install a Level 2 charging station at home. If your budget allows, you can consider if part of the cost of the car (it’s an added expense). There’s also a 30% federal tax credit (up to $1,000) for installing EV charging, which can make it less expensive. Still, if you are planning to use your EV for a daily commute of 40 miles or less per day, you should at least consider using Level 1 charging at home. You can always add a Level 2 charging station later if you decide you need it.    

In the works currently, 20,000 public Level 2 charging stations (limited to 6.6 kW) will be installed. Even if you only have Level 1 charger in your garage, you may have access to convenient Level 2 charging available while your car is parked and you’re doing something else.    
I’m already beginning to see these charging stations in my town and surrounding area. They now make it possible to drive 60 miles and pick up about 50 miles of range in 4 hours while you’re having fun, thus easily driving over the single-charge range while always keeping a healthy reserve.

 
Regardless if you decided to use a Level 1 or a Level 2 charger, remember that Next Gen Electric can install either of them for you! Still need some help deciding what is best for your needs? Shoot me a message. I’m happy to respond to inquiries regarding EV’s, chargers, and any other electrical questions: info@nextgencda.com. You can also schedule a FREE consult where I will come out to your home or business and go over options that suit you best.

How To Clean Solar Panels

Solar panels are generally self-cleaning, but in particularly dry areas or where panel tilt is minimal, dust and other substances such as bird droppings can build up over time and impact on the amount electricity generated by a module. Grime and bird poop doesn’t need to cover an entire panel to have an effect.

Tips for cleaning solar panel glass:

Safety First

Follow the procedure in your manual for shutting down the system before commencing cleaning. For safety reasons, it’s also wise to clean your panels from the ground if possible. A good quality soft brush and a squeegee with a plastic blade on one side and a cloth covered sponge on the other coupled with a long extension can make for the perfect tools allowing you to stay on the ground. Use a hose with a suitable nozzle to allow the stream of water to reach the panels.  NOTE: If cleaning your panels from the ground is not possible, do not attempt to access your rooftop unless you have the appropriate safety equipment and training. If you don’t; hire a suitably qualified professional instead.

Time of Day

Clean your panels on an overcast day, early in the morning or in the evening. If the sun is beating down on the panels, any water used can quickly evaporate and dirt will become smeared.  Early morning can be a particularly good time for cleaning as dew that has settled on the panels overnight will likely have softened grime; meaning you’ll need to use less water and less energy to clean your solar panels.  If the panels are dry, before tackling the modules with water, brush off any loose materials first – this will make cleaning easier and faster.

Materials

Don’t use metal objects or harsh abrasive products for removing caked on materials – scratching the glass on a solar panel can affect its performance as scratches will cast shadows. Avoid using detergents if possible as these may streak the glass of the panel. Use of abrasive powders also risks scratching the panels.  Given the nature of good quality solar panel glass, clean water and a little scrubbing with a coarse cloth covered sponge or soft brush should remove the most stubborn grime.  Plastic scourers may also be used.  If your mains-supplied water is hard (mineral-rich) and rainwater is available; use that as a final rinse; then squeegee dry. If hard water is all you have, just be sure to squeegee well as mineral-laden water can form deposits on glass as it dries.

Dealing with Oily Stains

Oily stains can occur in some installation scenarios, such as if you live near an airport and are under a flight path or if you live adjacent to and downwind of a major roadway frequented by trucks. If oily stains start appearing on your panels; isopropyl alcohol can be used as a spot-cleaning substance..

The final word on solar panel cleaning:

The old saying “if it ain’t broke, don’t fix it” applies – in most residential installation scenarios, solar panel cleaning just isn’t worth the bother – or the potential danger if accessing your rooftop. Unless dirt is clearly visible or performance is noticeably impacted; simply let nature do the job for you.